 Skip to content
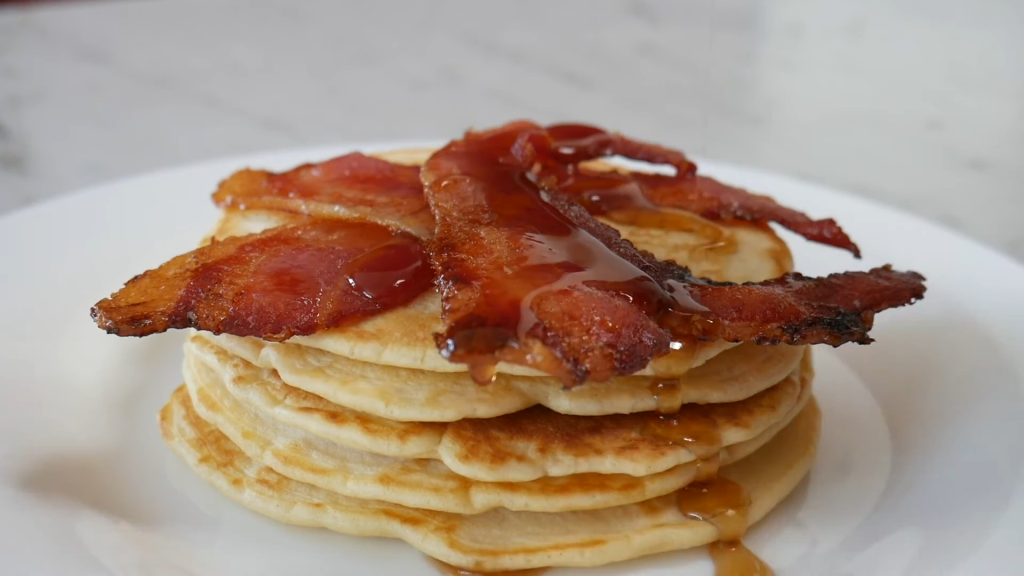
Did you know that bacon cooked at exactly 375°F (190°C) reaches the perfect crispy-chewy texture in just 16-20 minutes? As someone who’s flipped thousands of bacon strips (and burned hundreds in my early days!), I’ve cracked the code to achieving that golden-brown perfection that makes maple bacon pancakes absolutely irresistible. Whether you’re a weekend brunch warrior or a breakfast-for-dinner enthusiast, getting your bacon game right is the key to elevating your pancake experience. Let me share everything I’ve learned about creating that perfect crispy slice!
I still remember the morning I served charred bacon at my first big family brunch – talk about a humbling experience! But after years of testing and tweaking (and yes, setting off more than a few smoke alarms), I’ve mastered the art of achieving that perfect balance between crispy and chewy. Trust me, your pancakes deserve better than soggy or burnt bacon!
The Science Behind Perfect Bacon Crispiness
Let’s get a bit nerdy for a minute – because understanding the science behind crispy bacon changed my whole breakfast game! I used to think cooking bacon was just about throwing it in a pan and hoping for the best. Boy, was I wrong.
The magic really happens through something called the Maillard reaction – it’s this amazing chemical process between amino acids and sugars that gives bacon its irresistible golden-brown color and that complex, savory flavor we all love. I discovered this the hard way after wondering why my low-temperature bacon never tasted as good as my local diner’s!
Here’s what I’ve learned about the fat rendering process: bacon needs time to render its fat properly. You know that white stuff in your bacon? That’s pure flavor waiting to transform! When you cook bacon too quickly at too high a temperature, you end up with a sad combination of burnt edges and chewy middles. Nobody wants that on their pancakes!
Temperature control is absolutely crucial – and this was my biggest “aha!” moment. Starting with a cold pan (yes, cold!) allows the fat to render gradually, leading to more even cooking. I kept making the mistake of preheating my pan until I learned this trick from a chef friend. What a game-changer!
Speaking of thickness – it matters more than you might think. Through countless Sunday brunches, I’ve found that different thicknesses need different cooking approaches. Thin bacon needs gentle heat to avoid burning, while thick-cut bacon requires more time and patience to achieve that perfect texture.
Choosing the Right Bacon for Pancakes
Can we talk about bacon shopping for a minute? Because standing in the bacon aisle used to completely overwhelm me! After trying virtually every type of bacon available (tough job, but someone had to do it!), I’ve learned that not all bacon is created equal – especially when it comes to pancake pairings.
Let’s start with thickness – this is crucial, folks! For pancakes, I’ve found that medium-thick cuts work best. Too thin, and they’ll crumble when you try to layer them on your pancakes. Too thick, and you’ll end up with chewy bits that overwhelm the delicate pancake texture. My sweet spot? Something around 1/16 to 1/8 inch thick.
When it comes to brands, I’ve done some serious “research” (my family wasn’t complaining!). While I won’t play favorites, I look for bacon with a good meat-to-fat ratio – about 50/50 is perfect. Those super-lean varieties might seem healthier, but they often end up dry and brittle. Trust me, I learned this lesson the hard way during a “health kick” phase that resulted in some very sad pancakes.
Here’s something that confused me for years – what’s the deal with cured versus uncured bacon? Well, I finally got to the bottom of it. Both are actually cured; uncured bacon just uses natural nitrates (usually from celery powder) instead of synthetic ones. In terms of cooking for pancakes, I’ve found that traditionally cured bacon tends to crisp up more predictably.
Center cut versus regular cut? This one’s interesting! Center cut comes from the middle of the pork belly and is typically leaner. While it might be better for some dishes, for pancakes, I actually prefer regular cut. The extra fat helps create that perfect crispy-chewy texture that complements fluffy pancakes so well.
Don’t even get me started on specialty bacons! Maple-cured bacon can be amazing with pancakes, adding an extra layer of sweetness that’s just chef’s kiss. But watch out – some brands go overboard with the maple flavor, making your pancake stack taste like a sugar bomb. I learned this the hard way at a brunch party where everyone’s teeth were aching by dessert!
Top Methods for Cooking Crispy Bacon
Alright, let’s get down to the nitty-gritty of cooking methods! Over the years, I’ve tried every bacon-cooking technique under the sun, and I’m here to share what actually works. No more guessing games – just reliable methods for perfectly crispy bacon every time.
The oven method is my absolute go-to for big batches, and here’s why: it’s practically foolproof! Line a baking sheet with foil (trust me on this – cleanup will be so much easier), place a cooling rack on top, and arrange your bacon in a single layer. Here’s the trick I wish I’d known years ago: start with a cold oven, place your bacon in, then set it to 375°F. This gradual heating helps render the fat perfectly, resulting in evenly cooked strips every time. It takes about 20-25 minutes, giving you plenty of time to focus on your pancake batter.
Now, let’s talk about the cast iron skillet technique – my weekend warrior method! There’s something almost therapeutic about cooking bacon in cast iron. Start with a cold skillet (sensing a pattern here?), arrange your bacon strips, then turn the heat to medium-low. The key is patience – resist the urge to crank up the heat! I used to make this mistake constantly, ending up with bacon that was burnt on the outside and raw in the middle. Not anymore! About 8-10 minutes per side does the trick.
The air fryer method was a complete revelation to me! After receiving an air fryer as a gift (thanks, Mom!), I discovered it’s perfect for small batches of bacon. Set it to 350°F, arrange a few strips in the basket without overlapping, and cook for about 8-10 minutes. The circulating hot air creates incredibly crispy bacon, though you’ll need to watch it carefully the first few times as different air fryer models can vary quite a bit.
Let’s address the elephant in the room – microwave bacon. Yes, it’s possible, and yes, it can actually be decent! While it’s not my first choice for pancake accompaniment, it’s a solid backup plan when time is tight. Use a microwave bacon tray or layer paper towels on a plate, arrange bacon in a single layer, cover with another paper towel, and cook in 1-minute intervals. The trick is to check it frequently – microwaves can turn crispy bacon into bacon bits in seconds!
Common mistakes? Oh, I’ve made them all! Overcrowding the pan (leads to steaming instead of crisping), starting with hot pans (causes uneven cooking), flipping too frequently (prevents proper rendering), and not patting the bacon dry before cooking (creates splatter and uneven cooking). Learn from my failures, folks!
Pro Tips for Perfect Integration with Pancakes
Let’s talk about the art of bringing bacon and pancakes together – because timing is everything! Through years of hosting weekend brunches (and dealing with my fair share of cold bacon disasters), I’ve figured out some foolproof strategies for perfect integration.
Timing is crucial, and here’s my secret: I start the bacon about 15 minutes before I begin making pancake batter. This way, the bacon is finishing up just as the first batch of pancakes comes off the griddle. But what if things don’t align perfectly? No worries! I keep my bacon warm in a 200°F oven, arranged on a wire rack so it stays crispy. Game changer!
Temperature management was something I really struggled with initially. You want both your pancakes and bacon to be hot when served, but you don’t want the bacon to lose its crispiness. Here’s what works: if you’re making bacon in advance, let it cool completely on paper towels (this helps it stay crispy), then reheat it briefly in a 350°F oven for 2-3 minutes just before serving. The bacon will be perfectly crisp and hot, ready to meet your fresh-off-the-griddle pancakes.
Storage and reheating might sound basic, but trust me – there’s an art to it! If you’re prepping for a big brunch, you can actually cook your bacon the day before. Let it cool completely, store it in layers separated by parchment paper in an airtight container, and refrigerate. Just don’t stack it while it’s warm – I learned that lesson the hard way when all my perfectly crispy bacon turned into one sad, stuck-together mass!
The great debate: to chop or not to chop? After countless brunches and family gatherings, I’ve found that offering both options is the way to go. I usually chop about half my bacon into bite-sized pieces (perfect for sprinkling!) and leave the rest as whole strips for those who like to play with their food (no judgment – I’m one of them!). Pro tip: if you’re chopping, do it while the bacon is still slightly warm – it’ll break cleanly instead of shattering into bacon dust.
Flavor Pairing and Serving Suggestions
This is where the magic really happens – combining flavors and textures to create the perfect bite! Through plenty of delicious “research,” I’ve discovered some amazing combinations that’ll take your maple bacon pancakes to the next level.
Let’s talk maple syrup first – because not all maple syrups are created equal! After trying everything from the fancy Grade A Dark Robust to the basic pancake syrups, I’ve found that Grade A Medium Amber offers the perfect balance. It’s rich enough to stand up to the bacon’s smokiness without overwhelming the pancake’s fluffy texture. My favorite trick? Warm the syrup slightly (about 20 seconds in the microwave) before drizzling – it spreads more evenly and creates this amazing harmony with the warm pancakes and crispy bacon.
But why stop there? I love adding complementary toppings that enhance both the bacon and the pancakes. A sprinkle of coarse black pepper adds an amazing depth that plays beautifully with the sweet maple syrup. Sometimes I’ll add a tiny pinch of sea salt to the pancake tops – it makes the maple flavor pop and brings out the bacon’s smokiness even more. Just be careful with the salt, as the bacon already brings plenty to the party!
Temperature contrast is something I’ve become slightly obsessed with. Hot, fluffy pancakes, crispy warm bacon, and that slightly cooled maple syrup create this amazing sensory experience. I learned this trick from a chef friend: slightly chill your maple syrup container – not cold, but cool. The temperature difference between the warm pancakes, hot bacon, and cool syrup creates this incredible mouth-feel that’ll have your breakfast guests asking for your secret!
For plating, I’ve developed a fool-proof strategy: start with a stack of two or three pancakes, layer whole bacon strips between each pancake (this keeps them crispy longer), then sprinkle chopped bacon on top. Drizzle with maple syrup just before serving, and if you’re feeling fancy, add a small butter pat that melts into all the layers. The presentation is gorgeous, and more importantly, every bite has the perfect balance of flavors and textures.
Conclusion
Creating perfectly crispy bacon for your pancakes doesn’t have to be a morning struggle! After years of testing, tasting, and yes, plenty of tasty mistakes, I can confidently say that the key lies in starting with quality bacon, maintaining proper temperature control, and using the right cooking method for your setup. Whether you’re team oven-baked or cast iron devoted, the perfect crispy-chewy bacon is absolutely achievable!
Remember, patience is your friend when it comes to bacon cooking – rushing the process never ends well (trust me, I’ve learned this the hard way!). Take your time, pay attention to the details, and don’t be afraid to experiment until you find your perfect method. Your pancake game will never be the same!
Why not try one of these methods this weekend? Start with the oven-baked method if you’re new to this – it’s the most forgiving and gives consistently great results. And hey, even if your first attempt isn’t perfect, remember that even slightly imperfect bacon is still pretty amazing! Share your bacon-cooking victories (or funny failures) in the comments below – we’ve all been there, and the bacon-loving community is always here to help!
Stay crispy, my friends! 🥓✨
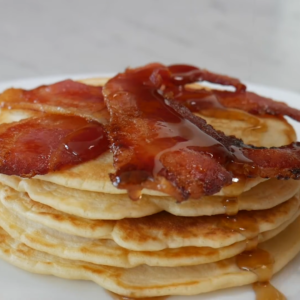
Maple Bacon Pancakes
Ingredients
Pancakes:
- 3 slices of crispy bacon crumbled
- 1 cup low fat buttermilk
- 2 eggs
- ¼ cup vegetable oil
- 3 tbsp bacon grease from cooking the bacon
- ¼ cup pure maple syrup
- 1 tbsp baking powder
- ½ tsp baking soda
- 2 cups all purpose flour
- ¼ tsp salt
Syrup:
- 4 tbsp powdered sugar
- ½ cup pure maple syrup hot
- 1 tbsp heavy cream
- Top off with some more crunchy bacon
Instructions
- Cook the bacon: Be sure to save some of the bacon grease after cooking.
- Pancakes: In a bowl, whisk together the wet ingredients until well combined. Gradually whisk in the dry ingredients, then fold in the crumbled bacon. Let the batter rest for about 15 minutes. Meanwhile, preheat your cooking pan and prepare the sauce.
- Cooking the pancakes: Pour the batter into the preheated pan, cooking each pancake for 1-2 minutes per side. Gently press the center—if it feels firm, the pancakes are ready.
- Sauce: Warm the pure maple syrup first, then whisk in the powdered sugar, followed by the heavy cream.
- Serving: Top the pancakes with crispy bacon and generously drizzle the maple sauce over them. Enjoy!
