Let me tell you something exciting – your snack game is about to level up big time! After spending countless weekends perfecting this recipe (and yes, setting off my smoke alarm more times than I’d like to admit), I’ve finally mastered the ultimate Praline Crunch Snack Mix. Would you believe that according to a recent Pinterest trends report, sweet and salty snack combinations have seen a whopping 47% increase in searches? That’s no surprise to me – this addictive treat has become the most requested item at every gathering I host!
I remember the first time I tried making this mix for my nephew’s graduation party. What a disaster! The praline coating turned into a rock-hard mess, and I nearly gave up. But boy, am I glad I didn’t! Now, I’m excited to share all my tips and tricks so you can avoid those rookie mistakes I made. Trust me, this recipe is going to become your new go-to for everything from holiday gifts to weekend movie nights!
What is Praline Crunch Snack Mix?
Oh my goodness, where do I even begin? You know those moments when you can’t decide between sweet and salty snacks? That’s exactly where Praline Crunch Snack Mix comes in to save the day!
I first discovered this magical combination at my aunt’s house in Louisiana. She had this amazing way of combining traditional praline flavors – you know, that heavenly mixture of caramelized sugar and butter – with crunchy snack mix ingredients. It was like nothing I’d ever tasted before!
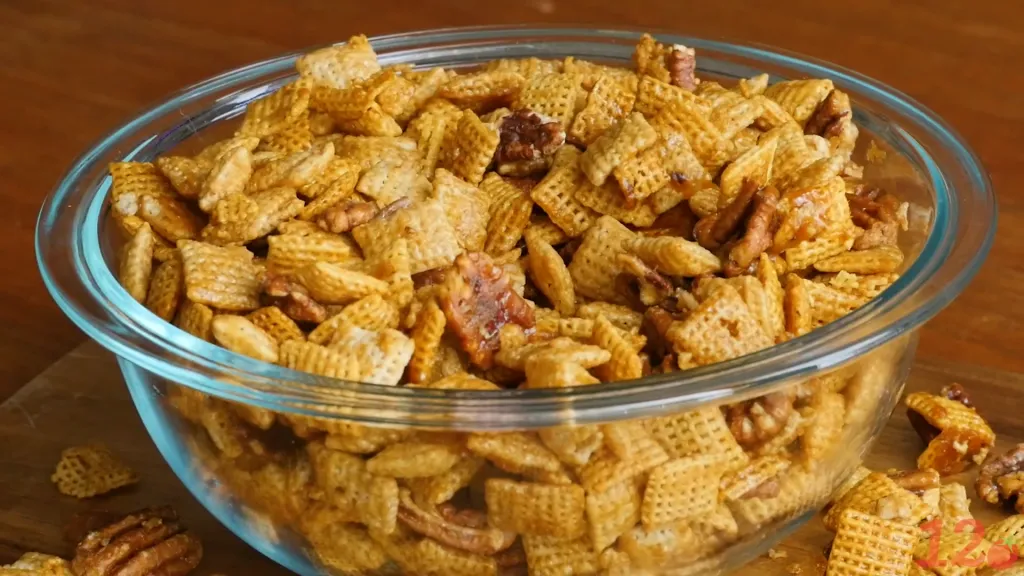
Think of it as the fancy cousin of your regular party mix. Instead of the usual savory seasoning, we’re coating everything in a buttery, brown sugar praline mixture that transforms simple ingredients into something absolutely extraordinary. The base typically includes a variety of nuts (pecans are traditional, but don’t let that limit you!), crispy cereal pieces, and pretzels for that perfect salty kick.
What makes this mix so special is how it brings together different textures and flavors. You get the crunch from the cereals and pretzels, the richness from the nuts, and that amazing praline coating that ties everything together. It’s basically impossible to eat just one handful – trust me, I’ve tried!
Speaking of portions (and I probably should mention this), a typical serving size is about 1/2 cup. While this treat isn’t exactly health food, it’s actually not as calorie-heavy as you might think when enjoyed in moderation. Plus, the nuts provide some protein and healthy fats, so I like to think of it as somewhat balanced… at least that’s what I tell myself!
Essential Ingredients
Let’s talk about what you’ll need to make this amazing snack mix! After countless trips to different grocery stores and way too many experiments, I’ve figured out exactly which ingredients give you the best results.
First up, let’s break down our base ingredients. You’re going to need:
- 3 cups of pecan halves (trust me, whole pieces work better than chopped)
- 2 cups of your favorite crispy cereal (I use a mix of Chex and Cheerios)
- 1 cup of mini pretzels
- 1 cup of cashews (optional, but they add amazing buttery flavor)
For that magical praline coating (this is where the magic happens!):
- 1 cup brown sugar (dark or light, both work great)
- 1/2 cup butter (please use real butter, not margarine – I learned this the hard way!)
- 1/4 cup light corn syrup
- 1 teaspoon vanilla extract
- 1/2 teaspoon baking soda
Here’s a pro tip I discovered after many failed attempts: the quality of your nuts really matters! I always try to get the freshest nuts possible – if they’re starting to taste even slightly off, they’ll only get worse during baking. I actually keep my nuts in the freezer to maintain freshness until I’m ready to use them.
When it comes to choosing cereals, you want something that can stand up to the coating process. I’ve tried pretty much every cereal out there (yes, even the sugary ones!), and rice or corn-based cereals like Chex work best because they maintain their crunch. Once, I tried using flaky cereals, and they turned into a soggy mess – definitely not what we’re going for!
Step-by-Step Praline Crunch Snack Mix Preparation Method
Alright, let’s get cooking! After making this recipe probably hundreds of times (my family keeps requesting it!), I’ve got the process down to a science. Let me walk you through it step by step.
First things first – preparation is key! Here’s what you’ll need:
- A large rimmed baking sheet
- Parchment paper (don’t skip this!)
- A large saucepan
- A heat-resistant spatula
- A large mixing bowl
Now, let’s get started:
- Preheat your oven to 300°F (150°C). I know it seems low, but trust me – we want to bake this mixture slowly to prevent burning. I learned this the hard way after scorching my first few batches at higher temperatures!
- Line your baking sheet with parchment paper. One time I tried using foil, and let’s just say it was not fun trying to peel the hardened praline off of it.
- In your large mixing bowl, combine all your dry ingredients – the nuts, cereals, and pretzels. Make sure everything is evenly distributed. I like to do this first so I’m not rushing once the praline coating is ready.
For the praline coating (this is where the magic happens!):
- In your saucepan, combine the butter, brown sugar, and corn syrup. Heat over medium heat, stirring constantly. This is not the time to check your phone – I’ve ruined more than one batch by getting distracted!
- Once the mixture starts to bubble, cook for exactly 5 minutes, stirring continuously. I actually use a timer because precision really matters here.
- Remove from heat and quickly stir in the vanilla extract and baking soda. The mixture will foam up – that’s exactly what we want! This creates that perfect, airy coating texture.
- Pour the hot praline mixture over your dry ingredients and stir gently but quickly to coat everything evenly. Be careful not to break up the cereal pieces.
- Spread the mixture onto your prepared baking sheet in an even layer. Don’t worry if it looks a bit messy – it’ll all come together in the oven.
- Bake for 30 minutes, stirring gently every 10 minutes. This helps ensure even coating and prevents burning. Set a timer – these 10-minute intervals are crucial!
- Once done, remove from the oven and let it cool completely. The hardest part is waiting, but resist the urge to snack on it while it’s hot (speaking from painful experience here!).
Tips for Perfect Results
After making this recipe more times than I can count (and dealing with plenty of kitchen fails along the way), I’ve learned some game-changing tips that’ll help you nail this recipe every single time!
The biggest game-changer? Temperature control! Here’s what I mean:
Your butter should be room temperature before you start. I can’t tell you how many times I’ve tried to rush this by using cold butter, only to end up with an uneven praline coating. Now I always set my butter out about an hour before I plan to start.
When it comes to humidity, it can be your worst enemy! I learned this the hard way when making a batch for a summer beach party – talk about a sticky situation! If you’re making this on a humid day, reduce the corn syrup by about 1 tablespoon and add an extra 5 minutes to the baking time. Works like a charm!
Here are some other common issues I’ve encountered and how to fix them:
Coating crystallizes too quickly:
- You’re probably cooking the praline mixture at too high a temperature
- Keep it at medium heat and stir constantly
- Don’t rush the process – those 5 minutes of cooking time are crucial
Mix turns out too sticky:
- Usually means it needs more time in the oven
- Add 5-minute increments until it reaches the perfect crunch
- Let it cool COMPLETELY before storing
Uneven coating:
- Stir more frequently during baking (every 8 minutes instead of 10)
- Make sure your baking sheet isn’t overcrowded
- Use a larger baking sheet if needed
Serving and Gifting Ideas for Praline Crunch Snack Mix
You wouldn’t believe how many compliments I’ve gotten on my gift packaging for this mix! After years of trial and error (and some pretty questionable presentation attempts), I’ve discovered some fantastic ways to serve and gift this addictive treat.
For parties, I love using clear glass containers – they really show off all those gorgeous glazed pieces! I learned a cute trick from my sister: place a battery-operated tea light under a clear glass bowl for a beautiful glowing effect that makes the praline coating shimmer. It’s such a show-stopper!
When it comes to gifting, presentation is everything! Here are my favorite ways to package this mix:
Holiday Gifts:
- Mason jars decorated with ribbon and custom labels
- Clear cellophane bags tied with colored twine
- Mini paper takeout boxes (these are super cute for wedding favors!)
- Vintage cookie tins (great for shipping to far-away friends)
For portion control (which, let’s be honest, is a challenge with this addictive mix!), I’ve found that small mason jars are perfect. They hold about 1 cup each, which is great for:
- Individual party favors
- Lunchbox treats
- Desktop snacks
- Car trip munchies
One of my favorite serving tips for parties: I set out small paper cups or cupcake liners next to the mix. This not only helps with portion control but also keeps things sanitary when you’re hosting a crowd. Plus, it looks super cute!
Variations and Adaptations for Praline Crunch Snack Mix
Over the years, I’ve experimented with SO many different variations of this recipe – some were happy accidents, others were special requests from family and friends. Let me share some of my absolute favorites!
For the fall season, I created what I call my “Autumn Harvest” version:
- Add pumpkin spice to the praline coating
- Mix in some dried cranberries after baking
- Include pepitas (pumpkin seeds) in the nut mixture
- Sprinkle with a tiny bit of sea salt when cooling
For those watching their sugar intake, I’ve developed a lower-sugar version that still tastes amazing:
- Use sugar-free maple syrup instead of corn syrup
- Reduce brown sugar by half and add sugar-free brown sugar substitute
- Include more nuts and fewer cereals
- Add unsweetened coconut flakes for natural sweetness
Got special dietary needs? I’ve got you covered:
Gluten-Free Version:
- Use certified gluten-free cereals
- Replace pretzels with extra nuts or gluten-free pretzels
- Double-check vanilla extract is gluten-free
- Consider adding gluten-free rice crackers for extra crunch
Vegan Adaptation:
- Use vegan butter (Earth Balance works great!)
- Check cereals for hidden animal products
- Add more nuts and seeds for protein
- Consider adding dried fruit for extra flavor
For those who like it spicy (this version has become legendary at my game night gatherings):
- Add 1/4 teaspoon cayenne to the praline mixture
- Include wasabi peas
- Sprinkle with chipotle powder after baking
- Add curry-spiced cashews
Kid-Friendly Version:
- Use chocolate-flavored cereals
- Add mini marshmallows after cooling
- Include M&Ms or similar candies
- Make it colorful with different colored cereals
Conclusion
Remember, the key to successful variations is maintaining the basic ratio of coating to dry ingredients. I learned this the hard way when I once tried to add too many extras and ended up with a barely-coated mix!
Now that you’re armed with all my tips, tricks, and variations, it’s time to get in the kitchen and start creating your own perfect batch of Praline Crunch Snack Mix! Remember, don’t get discouraged if your first attempt isn’t perfect – it took me quite a few tries to get it just right. The best part about this recipe is that even the “mistakes” usually taste pretty amazing!
Would you believe that this recipe has become so popular among my friends that I now make it in bulk for holiday gifts? Last Christmas, I made over 50 batches! And you know what? Each batch still brings me joy to make, especially when I think about how much happiness it brings to others.
I’d love to hear about your experiences making this mix! Drop a comment below with your favorite variations or any questions you might have. And don’t forget to take a picture of your creation – this mix is totally Instagram-worthy! Happy snacking!
Praline Party Crunch Mix
Ingredients
- 8 cups Crispix cereal
- 2 cup pecan halves
- ½ cup dark brown sugar packed
- ½ cup light corn syrup
- ½ cup salted butter
- 1 teaspoon vanilla extract
- ½ teaspoon baking soda
Instructions
- Preheat the oven to 250ºF and lightly coat a baking sheet or roasting pan with cooking spray.
- In a large bowl, combine 8 cups of Crispix cereal and 2 cups of pecan halves.
- In a medium saucepan, heat ½ cup of dark brown sugar, ½ cup of light corn syrup, and ½ cup of salted butter over medium-high heat. Bring the mixture to a boil, stirring occasionally. Once boiling, remove from heat and stir in 1 teaspoon of vanilla extract and ½ teaspoon of baking soda.
- Pour the caramel mixture over the cereal and pecans, tossing gently to coat everything evenly.
- Spread the coated cereal mixture evenly onto the prepared baking sheet. Bake for 1 hour, stirring every 15 minutes.
- Once baked, transfer the mixture onto wax or parchment paper to cool. Break into pieces before serving.