 Skip to content
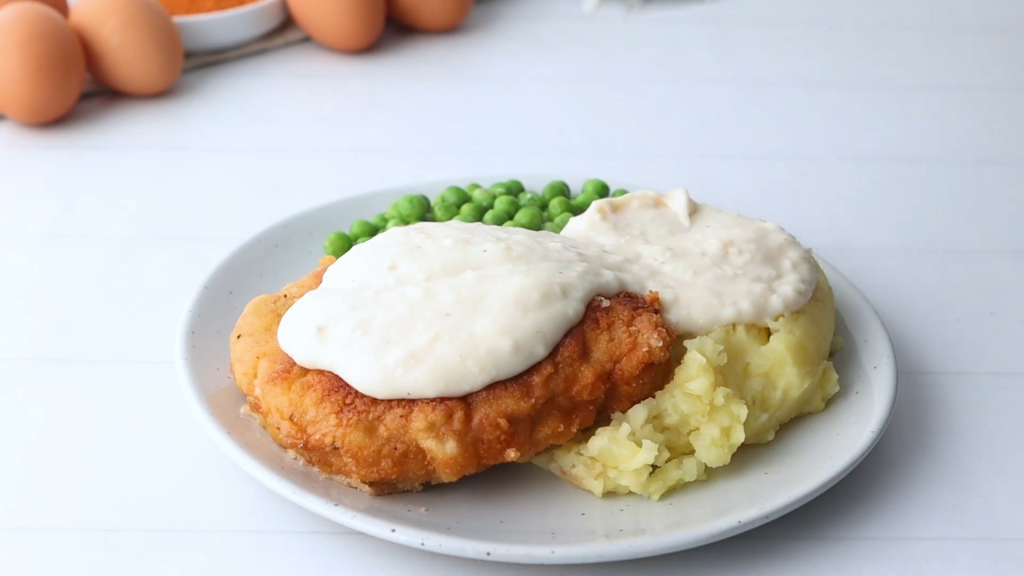
Did you know that pork chops were the most popular cut of pork in American households during the 1950s? And for good reason! There’s nothing quite like the satisfying crunch of a perfectly fried pork chop. I’ve spent years perfecting this country fried pork chop recipe, and let me tell you – the secret is all in the preparation! After countless family dinners and some spectacular failures (like that time I burned the coating but left the inside raw!), I’ve finally mastered the technique. Get ready to create the most mouthwatering country fried pork chops you’ve ever tasted!
Essential Ingredients for Country Fried Pork Chops
Let me tell you about the time I tried to make country fried pork chops with thin-cut boneless chops from the grocery store’s discount bin. Big mistake! After that disaster, I learned that choosing the right ingredients makes all the difference in creating that perfect, crispy-on-the-outside, juicy-on-the-inside pork chop.
First things first – let’s talk about the star of the show: the pork chops themselves. I’ve found that bone-in center-cut pork chops, about 1-inch thick, give you the best results. Trust me, I’ve tried every cut out there! The bone helps keep the meat moist during frying, and that extra thickness means you won’t end up with dried-out meat.
For the breading, you’ll want to create what I call the “trinity of crunch.” Here’s my tried-and-true mixture that took years to perfect:
- 2 cups all-purpose flour (don’t get fancy here – regular flour works best!)
- 1 tablespoon garlic powder
- 1 tablespoon onion powder
- 2 teaspoons paprika
- 1 teaspoon cayenne pepper (adjust to your heat preference)
- 2 teaspoons black pepper
- 2 teaspoons salt
For the wet ingredients, buttermilk is your best friend! I learned this trick from my grandmother, and it’s a game-changer. If you don’t have buttermilk on hand (who does, really?), you can make your own by adding a tablespoon of lemon juice or vinegar to regular milk and letting it sit for 10 minutes.
When it comes to oil, you want something with a high smoke point. I made the mistake of using extra virgin olive oil once – what a smoky mess that was! Peanut oil or vegetable oil are your best bets. You’ll need enough to fill your skillet about 1/2 inch deep.
Speaking of skillets – let’s talk equipment. A heavy cast-iron skillet is absolutely essential. Sure, you can use other pans, but after teaching cooking classes for years, I’ve never found anything that creates that perfect golden crust quite like cast iron.
Preparing Your Pork Chops for Frying
Remember that time I just threw the pork chops straight from the package into the flour? Yeah, that didn’t work out so well. Proper preparation is crucial for achieving that restaurant-quality result we’re all after.
Start by bringing your pork chops to room temperature – this takes about 30 minutes. Cold meat hitting hot oil is a recipe for uneven cooking. While you’re waiting, make a few small cuts through the fat ring around the edges. This prevents the chops from curling up during frying (learned that one the hard way!).
Here’s my foolproof brining method that I’ve developed over years of trial and error:
- Mix 4 cups cold water with 1/4 cup kosher salt and 1/4 cup sugar
- Add your pork chops and refrigerate for 2-4 hours (no longer, or they’ll get too salty!)
- Remove and pat thoroughly dry with paper towels
Now, here’s a tip that took me way too long to learn – you need to really dry those chops after brining. I mean REALLY dry them. Any excess moisture is the enemy of a crispy crust. I usually go through 4-5 paper towels per chop!
Perfect Breading Technique
Oh boy, do I have some stories about breading disasters! But after years of teaching cooking classes, I’ve developed what I call the “dry-wet-dry” method that works every single time.
Set up your breading station like an assembly line. I use pie plates because they’re wide and shallow – perfect for dredging. Here’s my process:
First plate: Your seasoned flour mixture Second plate: 2 beaten eggs mixed with 1/4 cup buttermilk Third plate: More of your seasoned flour mixture
Here’s the crucial part that most recipes don’t tell you: let the breaded chops rest on a wire rack for about 15 minutes before frying. This helps the coating stick better during frying. I discovered this by accident when I got distracted by a phone call once – sometimes the best cooking tips come from happy accidents!
Common mistakes I see my students make (and I’ve made myself!):
- Not shaking off excess flour between steps
- Pressing the flour too hard into the meat
- Forgetting to season each layer
- Not letting the coating rest before frying
Frying Method and Temperature Control for Country Fried Pork Chops
Temperature control is where most home cooks struggle with country fried pork chops. Trust me, I’ve had my share of burnt-on-the-outside, raw-on-the-inside disasters! The key is maintaining a steady oil temperature of 350°F (175°C).
Here’s a trick I learned from a restaurant chef: if you don’t have a thermometer, drop a pinch of flour into the oil. When the batter sizzles and floats without burning, your oil is ready. If it sinks, the oil is too cold, and if it burns right away, the oil is too hot.
I typically fry each pork chop for about 4-5 minutes per side. But here’s the thing – don’t just set a timer and walk away! Watch for these visual cues:
- The edges should start to turn golden brown
- Small bubbles should form around the meat
- The meat should float slightly in the oil
One mistake I made early on was overcrowding the pan. Now I never fry more than 2-3 chops at a time, depending on the size of my skillet. Overcrowding leads to uneven cooking and a drop in oil temperature.
Gravy Making for Country Fried Pork Chops
Let me tell you about my first attempt at making country gravy – it was so lumpy, you could’ve used it to patch drywall! But now, after years of practice, I’ve got it down to a science.
The key to perfect country gravy starts with the drippings left in your pan after frying. Leave about 3 tablespoons of oil and all those delicious browned bits – that’s where the flavor lives! Here’s my never-fail method:
- Add 3 tablespoons of flour to the hot drippings
- Whisk constantly over medium heat for 2-3 minutes (this cooks out the raw flour taste)
- Gradually add 2-2.5 cups of whole milk, whisking constantly
- Season with salt, black pepper, and a pinch of cayenne
Here’s a pro tip I learned from a Southern chef: if your gravy gets too thick, add warm milk, not cold. Cold milk can create lumps faster than you can say “pass the biscuits!”
Serving Suggestions and Side Dishes
In my years of hosting Sunday dinners, I’ve learned that country fried pork chops are only as good as what you serve them with. The classic combinations became classics for a reason!
My go-to sides include:
- Creamy mashed potatoes (the perfect gravy vehicle!)
- Southern-style green beans with bacon
- Buttermilk biscuits
- Coleslaw for a fresh crunch
For a more modern twist, I sometimes serve these with:
- Roasted garlic Brussels sprouts
- Sweet potato mash
- Honey-glazed carrots
- Fresh corn salad
Wine pairing might seem fancy for country fried pork chops, but trust me – a nice Pinot Noir or even a crisp Riesling can really elevate the meal. Though honestly, a cold sweet tea is hard to beat!
Make-Ahead and Storage Tips for Country Fried Pork Chops
You know what’s funny? I used to think country fried pork chops were strictly a “serve immediately” kind of dish. Then life happened – soccer practice, late meetings, unexpected guests – and I had to get creative! Here’s what I’ve learned about making these ahead and storing them properly.
For Make-Ahead Preparation:
- Brine your pork chops up to 4 hours in advance
- Mix your seasoned flour and store in an airtight container (up to 1 week)
- Set up your breading station ingredients ahead of time
- Pre-measure your gravy ingredients
Storage Tips (because yes, leftovers can still be delicious!):
- Let pork chops cool completely before storing
- Layer them with parchment paper to prevent sticking
- Store in an airtight container in the fridge for up to 3 days
- Keep gravy separate in an airtight container
The best reheating method I’ve found (after many soggy attempts):
- Preheat your oven to 350°F
- Place pork chops on a wire rack over a baking sheet
- Heat for 10-15 minutes until crispy and warm
- Pro tip: spritz with a little oil before reheating for extra crispiness!
Troubleshooting Common Problems
Let me share some solutions to the most common issues I’ve encountered (and helped my cooking students solve):
Coating Falls Off:
- Didn’t dry the chops enough before breading
- Oil temperature too low
- Flipped the chops too soon
- Didn’t let the breading rest before frying
Solution: Pat meat thoroughly dry, ensure oil is 350°F, and let breaded chops rest 15 minutes before frying.
Undercooked Inside/Burnt Outside:
- Pork chops too thick or too cold
- Oil temperature too high
- Pan too hot in one spot
Solution: Use 1-inch thick chops at room temperature, maintain steady oil temperature, rotate pan if needed.
Greasy Results:
- Oil not hot enough
- Didn’t drain properly
- Wrong type of oil used
Solution: Use fresh oil at proper temperature, drain on wire rack (not paper towels).
Dietary Modifications and Variations
Over years of teaching cooking classes, I’ve had students with various dietary needs. Here are some successful modifications I’ve developed:
Gluten-Free Version:
- Replace all-purpose flour with rice flour or gluten-free all-purpose flour
- Add 1/2 teaspoon xanthan gum to help binding
- Double-coating recommended for extra crispiness
Lower-Fat Option:
- Use thin-cut boneless chops
- Spray with oil and air fry at 400°F for 12-15 minutes
- Flip halfway through cooking
Dairy-Free Alternative:
- Replace buttermilk with coconut milk + 1 tablespoon vinegar
- Use plant-based milk for gravy
- Add extra seasonings to compensate for reduced richness
Spice Variations I’ve Tested:
- Cajun Style:
- Add cayenne, thyme, and oregano to flour mixture
- Increase black pepper
- Add file powder to gravy
- Herb-Enhanced:
- Mix dried sage, thyme, and rosemary into flour
- Add fresh herbs to gravy
- Garnish with fresh herbs before serving
- Garlic Lover’s:
- Double the garlic powder
- Add granulated garlic to gravy
- Serve with roasted garlic cloves
Safety Tips and Food Handling
After teaching countless cooking classes, I can’t stress food safety enough! Here are my non-negotiable rules:
Temperature Guidelines:
- Pork must reach 145°F internal temperature
- Let rest 3 minutes before cutting
- Use separate thermometers for meat and oil
Oil Safety:
- Never fill pan more than halfway with oil
- Keep a fire extinguisher nearby (never use water on oil fires!)
- Allow oil to cool completely before disposing
Cross-Contamination Prevention:
- Use separate plates for raw and cooked pork
- Wash hands thoroughly between handling raw meat and other ingredients
- Clean all surfaces that contacted raw meat with hot, soapy water
Kitchen Tools Guide
Let me share what’s in my “country fried pork chops toolkit” – these are the items that make the process smoother and safer:
Essential Tools:
- 12-inch cast iron skillet (my trusty companion for 15 years!)
- Long-handled metal tongs
- Wire cooling rack
- Heavy-duty splatter screen
- Instant-read meat thermometer
- Oil thermometer
- Large shallow dishes for breading
- Paper towels
- Heavy-duty aluminum foil
Nice-to-Have Items:
- Meat mallet for even thickness
- Oil filter for reusing oil
- Electric skillet with temperature control
- Large baking sheets for holding breaded chops
- Gravy separator for smoother sauce
Remember, good tools make cooking easier, but they don’t guarantee success – that comes from practice and patience!
Final Thoughts and Tips
After years of making country fried pork chops, I can tell you that practice really does make perfect. Don’t get discouraged if your first attempt isn’t restaurant-quality – mine certainly wasn’t! Remember these key points:
- Choose thick, bone-in chops for the best results
- Take time with the preparation and breading
- Monitor your oil temperature carefully
- Make extra gravy – it always disappears first!
The beauty of this recipe is that it’s forgiving – even if your pork chops aren’t picture-perfect, they’ll still be delicious. And hey, if you’re like me, you’ll find that making country fried pork chops becomes a sort of meditation – there’s something deeply satisfying about the rhythmic process of dredging, frying, and that magical moment when golden-brown perfection emerges from the pan.
Why not give this recipe a try this weekend? I’d love to hear how your country fried pork chops turn out in the comments below. Remember, the key to success lies in properly preparing your meat, maintaining the right oil temperature, and mastering that perfect breading technique. Happy cooking!
Country Fried Pork Chops
Ingredients
- 6 boneless pork chops ½ inch thick
- ¾ teaspoon seasoned salt
- ½ teaspoon black pepper
For the dredge:
- 1 cup all-purpose flour
- 25 saltine crackers finely crushed
- 1 teaspoon seasoned salt
- 1 teaspoon garlic powder
- ½ teaspoon onion powder
- ½ teaspoon black pepper
- 2 large eggs
- ⅓ cup milk
- 1 tablespoon hot sauce
- shortening for frying
For the gravy:
- ¼ cup reserved oil
- ¼ cup all-purpose flour
- 2 cups milk
- ½ teaspoon kosher salt
- ½ teaspoon black pepper
Instructions
- Season the Pork Chops: Start by seasoning both sides of the pork chops with seasoned salt and pepper, then set them aside.
- In the first shallow bowl, place half of the flour.
- In the second bowl, mix the remaining flour with crushed saltine crackers, seasoned salt, garlic powder, onion powder, and black pepper.
- In the third bowl, whisk together the eggs, milk, and hot sauce until fully combined.
- Take one pork chop and dip it into the flour, shaking off any excess.
- Next, dip it into the egg mixture, allowing any excess to drip off.
- Finally, press it into the saltine mixture, making sure the coating sticks well.
- Place the coated pork chop on a sheet tray, then repeat with the remaining pork chops.
- In a large skillet over medium heat, melt enough shortening to reach about ¼ inch up the side of the pan.
- Once the oil reaches 350°F, add the pork chops, being careful not to overcrowd the pan (you may need to fry in batches).
- Cook each pork chop for 4-5 minutes per side, or until golden brown and cooked through (internal temperature should reach 160°F).
- Transfer the fried pork chops to a paper towel-lined plate to remove any excess grease. Repeat with the remaining chops.
- Reserve ¼ cup of the cooking oil, wiping out any excess from the pan.
- Return the reserved oil to the pan over medium-low heat, then whisk in the flour until smooth, cooking for 1 minute.
- Slowly add the milk while whisking constantly to prevent lumps. Season with salt and pepper to taste, adjusting as needed.
- Serve the crispy pork chops topped with the rich, creamy gravy. Enjoy!
