
Did you know that the average American spends 37 minutes preparing dinner each night? Well, I’ve got some amazing news for you! Get ready to create the creamiest, most delicious chicken alfredo tortellini in less time than that – and trust me, it’ll taste like you’ve been cooking all day. As someone who’s made this dish hundreds of times (and had my fair share of sauce-splitting disasters!), I’m here to share every secret I’ve learned for foolproof, restaurant-worthy results. Whether you’re a busy parent or just someone who loves good food without the fuss, this recipe is about to become your new best friend!
I remember the first time I tried to make chicken alfredo tortellini. It was a complete disaster! The sauce separated, the chicken was dry, and the tortellini stuck together in one big clump. But you know what? After years of trial and error (and lots of taste-testing – tough job, but someone had to do it!), I’ve perfected a method that works every single time. And the best part? It only takes 30 minutes from start to finish!
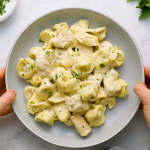
Quick Recipe Chicken Alfredo Tortellini Overview
Let me tell you, there’s nothing worse than getting halfway through a recipe and realizing you’re missing something crucial. Been there, done that! So before we dive into the nitty-gritty, let’s make sure you’re all set up for success.
For this recipe, you’ll need:
- 20 minutes of cooking time
- 10 minutes for prep
- A appetite for creamy, cheesy goodness!
Trust me, the effort-to-reward ratio here is off the charts. This recipe serves 4-6 people (or just 2 if you’re as obsessed with it as my family is!), and each serving comes in at around 520 calories. Not bad for something that tastes this indulgent!
What You’ll Need “Chicken Alfredo Tortellini”
Okay, let’s talk ingredients and tools. I’ve learned the hard way that having everything ready to go makes this process so much smoother. Here’s what you’ll want to have on hand:
Essential ingredients:
- 1 package (20 oz) refrigerated cheese tortellini
- 2 boneless, skinless chicken breasts
- 2 cups heavy cream (I love Organic Valley brand)
- 1 cup freshly grated Parmigiano Reggiano
- 4 tablespoons butter (trust me, go for the good stuff – I use Kerrygold)
- 2 cloves garlic, minced
- Salt and pepper to taste
For the kitchen tools, you’ll need:
- A large pot for boiling pasta
- A deep skillet or sauté pan
- A sharp knife
- A cheese grater
- Measuring cups and spoons
Pro tip: If you’re on a budget, you can totally use pre-grated parmesan and a regular non-stick pan. Will it be as fancy? Nah. Will it still be delicious? You bet!
The Perfect Chicken: Tips and Techniques
Let’s talk chicken – the make-or-break component of this dish. I can’t tell you how many times I’ve had dry, rubbery chicken ruin an otherwise perfect pasta! Through much trial and error (and maybe a few tears), I’ve finally cracked the code.
First things first – choosing the right cut. I always go for boneless, skinless chicken breasts. Sure, thighs are juicier, but breasts are easier to work with and look prettier in the final dish. Plus, with my method, they’ll be just as tender!
Here’s my quick marination secret: while you’re getting everything else ready, drizzle your chicken with a little olive oil and sprinkle with salt, pepper, and a pinch of garlic powder. Even this brief seasoning makes a world of difference!
Now, for the actual cooking – here’s where most people go wrong. They crank up the heat trying to get that nice golden color, but end up with chicken that’s charred on the outside and raw in the middle. Ugh! Instead, heat your pan to medium-high, add a tablespoon of butter, and cook the chicken for about 5-6 minutes per side. The magic number for internal temperature is 165°F (75°C), but I usually pull it off at 160°F and let it rest – it’ll reach the safe temp while it sits.
Short on time? Here’s my favorite shortcut: grab a rotisserie chicken from the grocery store! I’ve totally done this on crazy weeknights, and nobody could tell the difference. Just shred it up and warm it in the sauce – instant perfectly cooked chicken!
Mastering the Alfredo Sauce
Alright, let’s get to the heart of this dish – the sauce! I remember watching cooking shows where chefs would whip up alfredo sauce like it was nothing. Meanwhile, I was in my kitchen, whisking away at a grainy, separated mess. But don’t worry – I’ve got you covered with a foolproof method that works every time!
Here’s my never-fail 5-ingredient sauce recipe:
- 4 tablespoons butter
- 2 cups heavy cream
- 1 cup freshly grated Parmigiano Reggiano
- 2 cloves minced garlic
- Salt and white pepper to taste
The secret? It’s all in the technique and temperature control. Start by melting the butter over medium heat – not too hot! Add the garlic and sauté just until fragrant (about 30 seconds). Then, slowly pour in the cream while whisking constantly. Let it come to a gentle simmer – you’ll see little bubbles around the edge of the pan. Reduce the heat to low and gradually sprinkle in the cheese, whisking constantly. Season with salt and white pepper, and voila! Creamy, dreamy alfredo sauce.
Common mistakes I’ve made (so you don’t have to):
- Adding cold cheese to hot cream (it’ll clump!)
- Letting the sauce boil (hello, separation city)
- Using pre-grated cheese (it has anti-caking agents that can make your sauce grainy)
If your sauce does break, don’t panic! Here’s a quick fix: Take ¼ cup of heavy cream, heat it in a separate pan until warm, then slowly whisk your broken sauce into it. Works like a charm!
Make-ahead tip: The sauce can be made up to 2 days in advance and stored in an airtight container in the fridge. When ready to use, reheat gently over low heat, whisking occasionally.
Tortellini Selection and Cooking
Can we talk about tortellini for a minute? These little pasta pockets of joy can make or break your dish! I’ve tried every brand out there (it’s a tough job, but somebody’s got to do it), and I’ve got some opinions to share.
Fresh vs. frozen – what’s the deal? Well, fresh tortellini definitely has the edge in texture and flavor. It’s more delicate and cooks up perfectly al dente. But here’s the thing – frozen tortellini is still pretty darn good, and it’s usually way cheaper. Plus, you can keep it in your freezer for pasta emergencies (please tell me I’m not the only one who has those!).
If you’re going store-bought, here are my top picks:
- Buitoni Three Cheese Tortellini (fresh)
- Trader Joe’s Cheese Tortellini (frozen)
- Rana Five Cheese Tortellini (fresh)
Now, let’s talk cooking times. This is where I see a lot of people go wrong – nobody wants mushy tortellini! Here’s my foolproof method:
For fresh tortellini:
- Bring a large pot of water to a rolling boil
- Add a generous pinch of salt (the water should taste like the sea)
- Add tortellini and cook for 3-4 minutes
For frozen tortellini:
- Don’t thaw! Cook straight from frozen
- Boil for 5-6 minutes
How do you know when they’re done? Easy! They’ll float to the top of the water. But here’s my extra test – gently scoop one out and cut it in half. The pasta should be tender but still have a slight bite, and the filling should be hot all the way through.
Pro tip: Save about a cup of the pasta cooking water before draining. This starchy liquid is liquid gold if you need to thin out your sauce later!
Bringing It All Together ‘Chicken Alfredo Tortellini’
Alright, this is where the magic happens – bringing all our components together into one harmonious, creamy, totally irresistible dish! I’ve got to admit, the first time I tried to combine everything, it was a bit of a mess. The sauce was too thick, the tortellini stuck together, and the chicken was cold by the time I served it. But don’t worry – I’ve figured out all the kinks!
Here’s my step-by-step assembly process:
- Start with your sauce in a large, deep skillet over medium-low heat
- Add your cooked, sliced chicken to the sauce to warm it through
- Drain your tortellini (remember to save some pasta water!)
- Add the tortellini directly to the skillet with the sauce and chicken
- Gently toss everything together – I use two wooden spoons for this
Temperature control is crucial here. You want everything hot enough to serve, but not so hot that your sauce breaks. If the sauce seems too thick, this is where that reserved pasta water comes in handy. Add it a tablespoon at a time until you reach the perfect consistency.
For that restaurant-style presentation, try these garnishing tips:
- A sprinkle of freshly grated parmesan
- A few cracks of black pepper
- Some chopped fresh parsley for color
- A drizzle of extra virgin olive oil
As for serving, I love to pair this with a simple green salad dressed with lemon vinaigrette – the acidity helps cut through the richness of the dish. A piece of garlic bread wouldn’t hurt either (who am I kidding – it’s practically mandatory!).
Customization and Variations
Let’s get creative! While the classic recipe is amazing, sometimes it’s fun to switch things up a bit. Plus, I’ve had to adapt this recipe for various dietary needs over the years, and I’ve discovered some fantastic variations!
Adding veggies is an easy way to sneak in some extra nutrition. My favorites are:
- Sautéed mushrooms (add them while cooking the chicken)
- Steamed broccoli florets
- Wilted spinach (add at the very end)
- Roasted cherry tomatoes
For those who like it spicy (🙋♀️), try adding:
- A pinch of red pepper flakes
- A few dashes of hot sauce
- Cajun seasoning on the chicken
Need a lighter version? Here are some swaps I’ve tried:
- Use half-and-half instead of heavy cream
- Replace some of the cream with chicken broth
- Use less cheese (but really, why would you want to? 😉)
For my gluten-free friends:
- Look for gluten-free tortellini (I like Taste Republic brand)
- Use spiralized zucchini “noodles” instead of pasta
And for dairy-free options:
- Coconut cream can replace heavy cream
- Nutritional yeast adds a cheesy flavor
- There are some great vegan parmesan alternatives available now
Scaling the recipe is simple:
- For 2 people: Halve all ingredients
- For 8 people: Double everything and use two pans
Storage and Reheating
Okay, let’s talk leftovers! Although, who am I kidding – in my house, leftovers of this dish are about as rare as a unicorn sighting. But on the off chance you do have some, or if you’re meal prepping, here’s everything you need to know.
First up, storage containers matter! I learned this the hard way after a tragic incident with a leaky plastic container and my favorite work bag. Glass containers with airtight lids are your best bet. They’re not just leak-proof, they also won’t stain or retain odors.
How long will it last?
- In the fridge: 3-4 days
- In the freezer: Up to 3 months (but the sauce might separate a bit)
Now, let’s talk reheating. Microwaving is quick, but it can leave you with rubbery chicken and separated sauce. Instead, try this method:
- Place in a skillet over medium-low heat
- Add a splash of milk or cream
- Cover and heat gently, stirring occasionally
- If the sauce is too thick, add more liquid a little at a time
For meal prep, I’ve got a genius tip: keep the tortellini separate from the sauce! When you’re ready to eat, reheat the sauce, then add the tortellini and heat through. This prevents the pasta from getting soggy.
Conclusion
Well, there you have it, folks – everything you need to know to make the most amazing chicken alfredo tortellini of your life! From selecting the perfect ingredients to mastering that dreamy sauce, you’re now equipped with all my hard-earned secrets.
Remember, cooking should be fun, so don’t stress if everything isn’t perfect the first time. Trust me, I’ve had my share of kitchen disasters, but each one taught me something new. The key is to keep trying, keep tasting, and most importantly, keep enjoying the process!
I’d absolutely love to hear how this recipe works out for you! Did you try any of the variations? Did you discover any new tips of your own? Drop a comment below and let me know. And if you run into any trouble, don’t worry – I’m here to help!
Now, get in that kitchen and start cooking! Your taste buds (and whoever’s lucky enough to share this meal with you) will thank you. And hey, who knows? Maybe this will become your new go-to dish for impressing dinner guests or treating yourself after a long day. Either way, you’ve got this! 🍝👨🍳
Happy cooking, everyone!
Chicken Alfredo Tortellini Recipe
Ingredients
- 1 lb chicken breast diced
- 1 package 20 oz refrigerated cheese tortellini
- 2 cups heavy cream
- 1 cup grated Parmesan cheese
- 3 cloves garlic minced
- 1 tablespoon olive oil
- ½ teaspoon black pepper
- ¼ teaspoon salt
- ¼ cup fresh parsley chopped
Instructions
- In a large skillet, heat olive oil over medium heat. Add diced chicken and cook until no longer pink, about 5-7 minutes.
- Add minced garlic to the skillet and sauté for 1-2 minutes, until fragrant.
- Pour in the heavy cream and bring to a simmer. Stir in Parmesan cheese until melted and smooth.
- Season with black pepper and salt. Continue to simmer for 5 minutes, allowing the sauce to thicken.
- Meanwhile, cook the cheese tortellini according to package instructions. Drain and add to the skillet.
- Toss the tortellini with the creamy Alfredo sauce and cooked chicken until well combined.