
Did you know the average German consumes over 30 Pork Schnitzel per year? This beloved dish isn’t just food – it’s a cultural icon! As someone who’s spent years perfecting the art of schnitzel-making (and trust me, I’ve had my fair share of failures!), I can tell you that achieving that perfect golden-brown crust and juicy interior is nothing short of culinary magic.
Whether you’re a seasoned cook or just starting your culinary journey, mastering German Pork Schnitzel is a game-changer for your recipe repertoire. In this guide, I’ll walk you through everything I’ve learned – from selecting the perfect cut of pork to achieving that signature crispy coating that makes your taste buds dance with joy!
Get ready to dive into the world of traditional German cuisine. By the end of this article, you’ll be equipped with all the knowledge you need to create restaurant-quality schnitzel right in your own kitchen. Let’s get started!
The Rich History of German Schnitzel
Oh boy, if these crispy cutlets could talk! I remember my first trip to Germany, sitting in a cozy Gasthaus in Munich, when my server proudly announced that schnitzel had been perfected over centuries. And you know what? She was right!
While many people think schnitzel originated in Germany, it actually has its roots in Austria as Wiener Schnitzel, traditionally made with veal. But Germans, being the practical folks they are, adapted the recipe to use pork – which was more readily available and affordable. And let me tell you, this adjustment was a game-changer!
Over time, each region in Germany developed its own spin on the dish. In Berlin, you might find it topped with a sunny-side-up egg (which, by the way, is absolutely delicious – I tried making it at home and only broke three yolks in the process!). Head south to Bavaria, and you’ll discover it served with a rich mushroom sauce, known as Jägerschnitzel.
The cultural significance of schnitzel in Germany can’t be overstated. It’s not just dinner – it’s tradition on a plate! From Sunday family gatherings to festival celebrations, schnitzel has a way of bringing people together. I’ve seen heated debates break out over the “correct” way to prepare it – trust me, Germans take their schnitzel seriously!
Choosing the Perfect Cut of Pork Schnitzel
Listen, I learned this the hard way – not all pork cuts are created equal when it comes to schnitzel! After one particularly chewy disaster (my poor dinner guests were too polite to complain), I finally got schooled by my local butcher.
The absolute best cut for pork schnitzel is the loin, specifically from the center. It’s lean, tender, and when pounded thin, creates the perfect foundation for your schnitzel. Look for meat that’s pink and firm with a small amount of marbling – but not too much! You want your schnitzel to be tender, not greasy.
Here’s a pro tip I wish I’d known earlier: build a relationship with your butcher! These meat maestros can be your best allies in schnitzel success. I once asked mine to cut the pork to the perfect thickness (about 1/4 inch before pounding), and it was a total game-changer. They can also ensure the meat is cut against the grain, which makes a huge difference in tenderness.
When it comes to quantity, plan for about 4-6 ounces per person. And always, always buy a little extra – trust me, people will want seconds of your perfectly prepared schnitzel!
Essential Tools and Ingredients
Okay, let’s talk tools and ingredients – the dynamic duo of schnitzel success! First up, you’re going to need a good meat mallet. I started with a regular old hammer (don’t judge!), but upgrading to a proper meat mallet was revolutionary. The flat side is perfect for evenly thinning the meat, while the textured side helps tenderize it.
For breading, you’ll need three shallow dishes – one for flour, one for beaten eggs, and one for breadcrumbs. Don’t try to skimp and use just one plate for everything (guilty as charged). I learned the hard way that this just leads to clumpy breading and frustration!
Now, about those breadcrumbs – this is where the magic happens! Traditional German schnitzel uses fresh breadcrumbs, not the store-bought dried ones. I know, I know, it’s extra work, but trust me, it’s worth it! Take day-old bread, remove the crusts, and either grate it or pulse it in a food processor. The texture difference is mind-blowing!
For the frying pan, bigger is better. You want a large, heavy-bottomed skillet that distributes heat evenly. I use a 12-inch cast iron skillet – it’s perfect for getting that gorgeous golden-brown crust without burning. And don’t forget about oil! I use a neutral oil with a high smoke point, like canola or vegetable oil. Save your fancy olive oil for another dish!
Step-by-Step Traditional Recipe Of Pork Schnitzel
Alright, fellow schnitzel enthusiasts, let’s get cooking! After countless attempts (and yes, some spectacular failures), I’ve finally nailed down the perfect process. Here’s my tried-and-true method:
- Start with your pork at room temperature – this ensures even cooking. Place it between two sheets of plastic wrap (learned this after redecorating my kitchen walls with flying pork!).
- Gently pound the meat with the flat side of your mallet, working from the center outward. You’re aiming for about 1/8 inch thickness. The first time I did this, I got a little… enthusiastic. Remember, we’re making dinner, not taking out frustrations!
- Now for the breading station. Set up your three shallow dishes:
- First dish: flour seasoned with salt and pepper
- Second dish: beaten eggs (I use 2 eggs per 4 schnitzels)
- Third dish: those lovely fresh breadcrumbs we talked about
- Dip each piece of pork in flour (shake off excess), then egg (let extra drip off), and finally breadcrumbs. Press the crumbs gently to adhere – don’t be shy, give them a little love pat!
- Here’s where patience is key – let the breaded schnitzels rest on a wire rack for about 10 minutes. This helps the coating stick better during frying. I used to skip this step, but trust me, it makes a difference!
- Heat your oil to 330-340°F (165-170°C). Don’t have a thermometer? Drop a breadcrumb in – if it sizzles and rises to the surface, you’re good to go!
- Carefully place your schnitzel in the hot oil. It should not be completely submerged – we’re pan-frying, not deep-frying! Cook for about 3-4 minutes per side until golden brown.
One common mistake (and boy, have I made them all!) is overcrowding the pan. Give your schnitzels some personal space – they need room to get crispy!
Expert Techniques for Restaurant-Quality Results
Want to know the secrets that took my schnitzel from “pretty good” to “wow, this tastes like it’s from a German restaurant”? Here they are!
First, let’s talk about the famous “wave” pattern in the breading. This isn’t just for looks – it actually helps create more surface area for that delicious crispiness! To achieve this, gently shake the pan back and forth while the schnitzel is frying. The first time I tried this, I was way too aggressive and ended up with oil everywhere – a gentle shimmy is all you need!
Temperature control is crucial. I keep a candy thermometer clipped to my pan to monitor the oil temperature. If it gets too hot, your breading will burn before the pork is cooked. Too cool, and you’ll end up with greasy, soggy schnitzel. Been there, done that, don’t recommend it!
Here’s a pro tip I picked up from a German chef: after dipping the pork in egg, let it drip for a full 10 seconds before moving to the breadcrumbs. This prevents the breading from becoming too thick and heavy.
And here’s my secret weapon – the double breading technique! After the first round of breading, dip the schnitzel back in the egg and then again in the breadcrumbs. This creates an incredibly crispy, never-fail crust. Just remember to be gentle – you don’t want to knock off the first layer!
Traditional Accompaniments and Sides
Oh, the sides – this is where a good schnitzel becomes an unforgettable meal! In my kitchen, no schnitzel is complete without classic German potato salad (Kartoffelsalat). Unlike its American cousin, German potato salad is served warm and has a tangy, vinegar-based dressing. I made the mistake of using mayo once at a dinner party – my German friend nearly fainted!
Another traditional side is cucumber salad (Gurkensalat). The cool, crisp cucumbers in a light, creamy dressing perfectly complement the rich, crispy schnitzel. It’s like they were made for each other!
Now, let’s talk beverages. A crisp German Pilsner is the traditional choice, and for good reason! The light, hoppy flavor cuts through the richness of the schnitzel perfectly. Not a beer drinker? A dry Riesling works wonderfully too. I’ve experimented with different pairings, and trust me, these classics are classics for a reason!
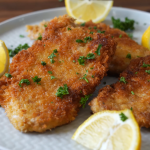
For sauce lovers (like myself!), schnitzel is often served with a wedge of lemon. Some regions have their own traditional sauces – my personal favorite is Jägersauce, a savory mushroom gravy. Though, I should warn you, some schnitzel purists consider adding sauce sacrilege! I once made this faux pas at a traditional German restaurant and got quite the lecture from our waiter!
Tips for Make-Ahead and Storage Pork Schnitzel
Let’s be real – sometimes you want to prep ahead or save leftovers (if there are any!). After years of trial and error, I’ve finally figured out the best methods for make-ahead schnitzel success!
For prep ahead, you can bread your schnitzels up to 4 hours before cooking. Place them on a wire rack in the fridge, uncovered. This actually helps the breading adhere better! The first time I tried this, I covered them with plastic wrap – big mistake! The breading got soggy and stuck to the wrap.
If you have leftover cooked schnitzel (which rarely happens in my house!), let them cool completely on a wire rack. This prevents the bottom from getting soggy. Store them in an airtight container with paper towels between each piece. They’ll keep in the fridge for up to 2 days.
Now, reheating is where things get tricky. The microwave is a no-go unless you like soggy breading (trust me, I learned this the hard way!). Instead, preheat your oven to 400°F (200°C), place the schnitzels on a wire rack over a baking sheet, and heat for about 10-15 minutes. This helps maintain that crispy exterior we worked so hard to achieve!
Can you freeze Pork Schnitzel? Yes, but… I recommend freezing them before cooking. Bread them as usual, place on a baking sheet lined with parchment paper, and freeze until solid. Then transfer to a freezer bag. They’ll keep for up to 3 months. When you’re ready to cook, let them thaw in the fridge overnight and proceed with frying as usual.
Conclusion
Well, my schnitzel-loving friends, we’ve covered a lot of ground! From the rich history of this beloved dish to the nitty-gritty details of achieving the perfect crisp, you’re now equipped to create authentic German Pork Schnitzel that would make any Oma proud!
Remember, like any culinary journey, mastering schnitzel takes practice. Don’t get discouraged if your first attempt isn’t picture-perfect – my early attempts looked more like “abstract art” than traditional German cuisine! The key is to keep trying, adjust as needed, and most importantly, enjoy the process.
What makes schnitzel truly special isn’t just its crispy exterior or juicy interior – it’s the way it brings people together. There’s something magical about placing a golden-brown schnitzel on the table and watching faces light up with anticipation.
I’d love to hear about your schnitzel adventures! What techniques worked for you? Did you discover any new favorite side dishes? Share your experiences in the comments below – let’s keep the schnitzel tradition alive and sizzling!
And remember, as we say in Germany, “Guten Appetit!” Now, if you’ll excuse me, all this schnitzel talk has made me hungry – I’ve got some pork to pound!
Pork Schnitzel with Dijon Gravy
Ingredients
- 4 pork loin chops boneless
- ½ cup all-purpose flour
- 2 eggs beaten
- 1 cup breadcrumbs
- 1 teaspoon salt
- ½ teaspoon black pepper
- ½ teaspoon garlic powder
- ½ teaspoon paprika
- 2 tablespoons olive oil
- 2 tablespoons butte
For the Dijon Gravy:
- 2 tablespoons butter
- 2 tablespoons all-purpose flour
- 1 cup chicken broth
- ½ cup heavy cream
- 2 tablespoons Dijon mustard
Instructions
- Prepare the PorkPlace each pork chop between two sheets of plastic wrap and pound to 1/4-inch thicknessSeason the pork chops with salt, pepper, garlic powder, and paprikaSet up a breading station:Dredge each pork chop in flourDip in beaten eggsCoat with breadcrumbsCook the SchnitzelHeat olive oil and butter in a large skillet over medium-high heatFry the pork chops for 3-4 minutes per side, until golden brown and cooked throughRemove from skillet and keep warmMake the Dijon GravyMelt butter in a saucepan over medium heatStir in flour and cook for 1-2 minutesGradually whisk in chicken broth and cook until thickened, about 5 minutesStir in heavy cream and Dijon mustardSeason with salt and pepper to taste
Notes
- Ensure the oil is hot enough before frying to achieve a golden-brown crust
- For extra crispiness, let the breaded pork chops rest for a few minutes before frying